Thanksgiving Goodwill Upcycle
Can you believe how close we are to Thanksgiving, Christmas and the New Year? I think everyone is ready to say goodbye to 2020, but before we all do, what do we have to be thankful for this year? I think that is a tough question for most of us. Personally, I feel very thankful for the opportunity to do these small upcycle projects for Goodwill!

This project is about fall and Thanksgiving ideas. As we say goodbye to the spooky skeletons and scary witches, it’s time to think of sweet pumpkins without faces and warm colors and cozy times with the family.
I headed out to two local Goodwill stores this time with only one idea in my head. I had looked for some inspiration, and as always, found an idea for books. Making pumpkins out of old books to be exact. Having done something with books the last couple of times, I figured I would keep up the tradition. Why might you ask? Books are something you can always find and are very inexpensive.
These items are all apart of my Goodwill haul:
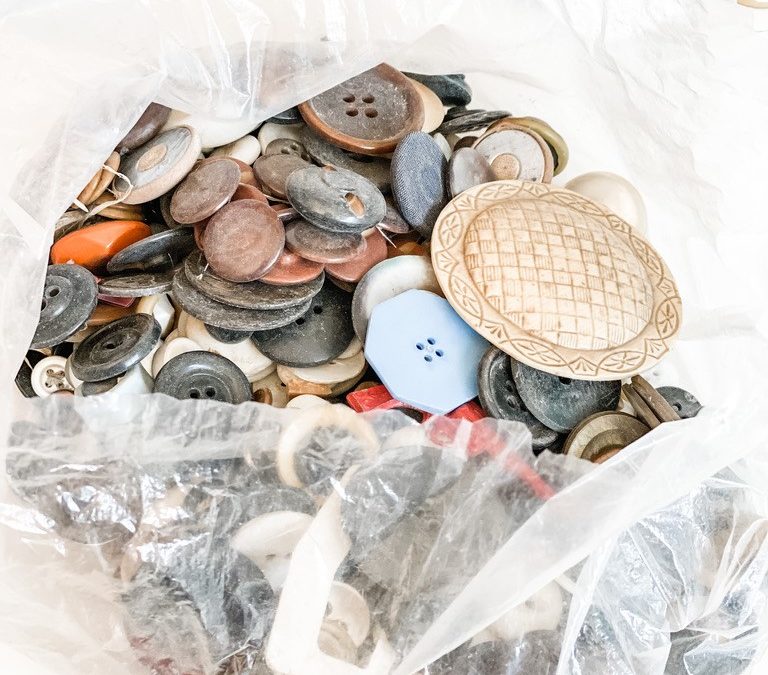
- A bag of old buttons for $5.99
- A dark green picture frame for $2.19
- 3 books for $3
- A men’s shirt for $8, this was a bit expensive for a home project, but it was a name brand shirt and had the original tags on them, and was in my husband’s size, so it was a win!
- An old ice bucket for $3
- A candle for $1.99
- Some glassware that was all $2.19 – $2.99 apiece
- A small bag of something that looked like walnuts – but I do not actually know what they were. It was $2.
- Last, but not least, a little wooden turkey for $2.19

My total was around $40. I did spend more money on this project than any others in the past. I probably could have edited a few things out, but I wanted to have options to create from, so I took it all home! And at that price for everything you cant go wrong.
Pumpkin Book Upcycle
I decided to start with pumpkins made from old books and hoped while working on those, I would come up with some other ideas. I will say, this project was very easy, but it was much more time consuming then I thought. I first started with tracing my book on a piece of paper to know the size.
I then made half of a pumpkin shape. There are printables out there if you don’t want to draw it yourself. I will say one of my pumpkins came out looking more like an apple, but it’s still cute! I left the bottom edge flat, so they would sit nicely.


I then started the task of cutting through the whole book to get every page that shape. I started out using an exacto knife to cut through the pages. I soon discovered, if I was going to do 3 books, this would take forever, as it would only cut through about 3-4 pages at a time. I then got a large box cutter and tried that for a bit. That tool did not get it done any faster. I then tried a pair of scissors, and if you cut through more than 3-4 pages at a time it didn’t make all the shapes uniform. So I stopped and looked around my kitchen to try to find something that would make this project go much faster. What I really wanted was an electric knife! I was tempted to run over to my moms and grab hers, but was hoping to find something in my own kitchen to do the task. My eyes fell onto my block of sharp knives and I thought – Why not? I grabbed my large serrated bread knife and went to town! It was awesome! It cut through all the pages with very little effort. If you try this at home, please be careful and keep your fingers out of the way.
Once I had all three books cut into the shape I wanted, I took the covers off the front and back and down the spine and painted the cut edge of the book with orange paint. I spent a lot of time painting and it was not necessary. I put a lot of detail into one book, giving it an ombre effect, but once the pages spread, you can’t make it out. So make this part fast and easy! You can use paint, marker, a stamp pad, almost anything. Once they were dry, I grabbed a few sticks from my yard and hot glued them to the spine of the book. I left some sticking out the top end to be the stem of the pumpkin, but the majority of it down inside to have something for the rest of the spine to adhere to.


I then wrapped the spine around the stick and glued the first and last page together.
I went through and every few pages ran a small bead of glue down the interior of the spine. This helped the pages spread evenly once standing up and gave the adhesive at the spine a bit of extra support so all the pages wouldn’t just fall apart.
I added some ribbon to the top for leaves on two pumpkins and some pipe cleaners to the last one and think they ended up really fun! You could use felt, fabric, ribbon, or dried leaves on yours!

My apple pumpkin!
Button Cornstock Upcycle
While painting and working on the pumpkins, I was trying to think of what else besides pumpkins is a symbol of Thanksgiving. An ear of corn came to mind and thought that would be the perfect thing to do with the buttons, and I could put it in the green frame! I wasn’t sure how to make this project look realistic, so I decided to look for a clipart picture. I found one I liked, printed it out on a piece of card stock, and decided to glue items to it!
I see button projects all the time on Pinterest and love how they look, but I had yet to find a bag of cheap buttons. They are too expensive to try to buy brand new ones. So I was so excited when I found this bag of buttons on my shopping trip at Goodwill!

I had no idea what I was getting in this bag, but it was worth a shot! I started to pick through to find smaller buttons in colors of yellows, golds, browns, blacks and maybe a few reds. I found everything I needed and barely made a dent in this bag!
I started with gluing on some raffia to make the outer leaves, then glued on the larger buttons then filled in with the smaller ones. I didn’t glue them down flat but overlapped them a bit to make it more 3D and more corn-like.


I was pretty pleased with how this Thanksgiving Goodwill upcycle looked when I was finished with it!

Fabric Pumpkin Upcycle
The next item I worked on was the ice bucket and shirt. I don’t think I needed to purchase the ice bucket, but I wanted to show how to use something unexpected, or something you already have at home for this.


The key was to use something round or cylindrical. If you want to use something you already have, you could use a jack-o-lantern instead of packing it away with the Halloween decorations. I’ve seen a roll of toilet paper used too (though that might be too valuable this year!).
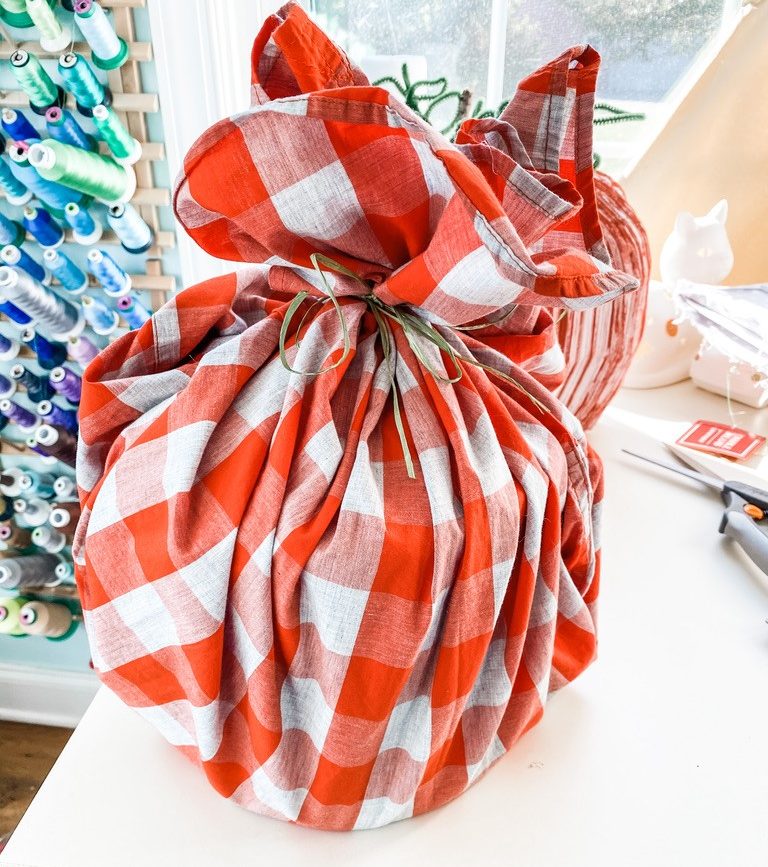
I took the shirt and spread it out buttons side up. I wanted to use it all in one piece so it could be worn later. You could use a shirt you purchase at Goodwill, one you own, scarves, neckties, or just some fabric.

I then just gathered the whole shirt up around the ice bucket and tied it with a piece of raffia. I tucked the shirt sleeves into the neck at the back, and here we have a super cute fabric pumpkin upcycle!
Easy Thanksgiving Goodwill Upcycles
I also had the walnut-shaped items and wooden turkey. I spray painted the walnuts metallic gold with spray paint and let them dry. After washing one of the glass pieces, I simply placed them in the glass container. This was a fast and easy project and something you could use for more than just Thanksgiving.

My plans for the turkey were very involved. I wanted to sand him down, make him a bit more streamlined, and paint his feathers a bunch of colors, but I was running out of time.
I chose to take the bow off to start with. The feathers were a separate piece and actually slipped off, so I just turned that around and put it back on. I then grabbed a dark brown paint that had a little glitter in it and just painted all of it. Maybe one day I’ll go back and do all the things I had planned, but for now, this is cute and simple. A super fast little updated makeover!


While shopping, I kept my eyes open for deep brown colors and greens. I knew I would have orange covered with the pumpkins, but I wanted to add some other rich earthy colors. If I did not find any, I thought about painting glass items to give it a sea glass effect, but I ended up finding some beautiful simple pieces in some rich colors.


This deep brown bottle and green oversized goblet were the perfect colors I was looking for. I turned the green piece upside down and used it to hold the candle. Here are a few ways that I put some of the items together!


ABOUT THE AUTHOR:
Shendra is a wife, busy mom of 2 boys with a sewing and embroidery business on the side. In her free time, she loves to work on The Christmas Gals blog with her friend Maureen and keep the spirit of Christmas alive all year long!